You must have encountered format incompatibility issues when importing AVI to iTunes. This is because iTunes does not support AVI video format as input. As we all know, iTunes only supports a few video formats – MP4, MOV, and M4V. If you get some AVI files, you cannot directly import AVI to iTunes or transfer AVI to iPhone, iPad, and iPod Touch via iTunes. To do this, we need to fully use the AVI to iTunes converter to convert the AVI to iTunes-compatible MP4, MOV, or M4V video formats before importing the AVI to iTunes. Now, let’s dive into the subject matter “How to Convert AVI files to iTunes?”.

As mentioned earlier, if you try to add AVI to iTunes, you will definitely encounter video format incompatibility issues. To prevent this from happening again, you must convert AVI to iTunes videos MP4, MOV, and M4V. For this purpose, an AVI to iTunes converter is a must-have. It is very important for us to choose a professional AVI to iTunes converter. If you choose an inappropriate video converter, you’re likely to get a poor-quality output file that will ruin your source file. A professional AVI to iTunes converter means it can convert AVI to iTunes videos at high speed while retaining the original quality.
WonderFox HD Video Converter Factory Pro is such a qualified AVI to iTunes converter. As a powerful AVI-to-iTunes converter, it can help you convert AVI to iTunes-supported video files without compressing the video quality. Apart from this, you can also modify all AVI files using the embedded editor. You can trim video length, crop video size, rotate video angle, apply special effects for better visual enjoyment, add watermarks, record screen, convert a video to GIF, etc. More features like subtitle selection and addition, SD to HD video creation are also on the offer list. Therefore, it is considered the best AVI to iTunes converter.
How to Convert AVI files to iTunes?
Step 1:
Load AVI files into the converter.
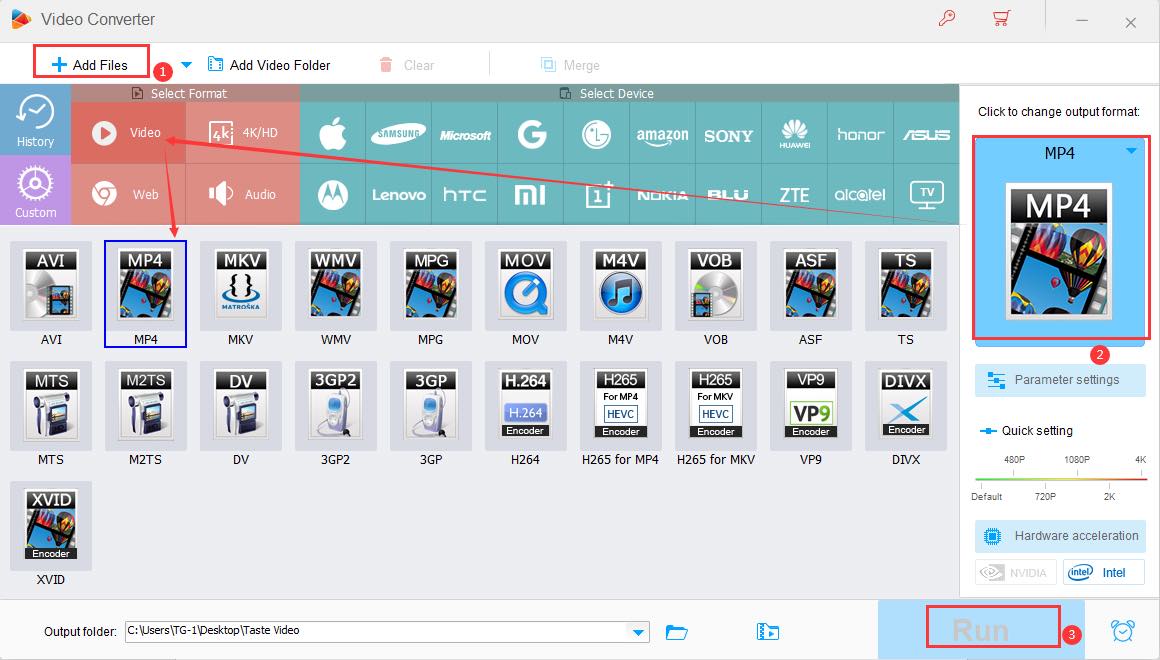
Launch WonderFox HD Video Converter Factory Pro, go to the “Converter” tab, and click the “Add Files” button on the submenu to load the source AVI video file. Alternatively, you can directly drag and drop AVI video files into the program interface. After importing AVI video files, you can play AVI video files, select subtitles and audio tracks from source AVI video files, add external subtitles to loaded AVI video files, edit loaded AVI video files, etc.
Step 2:
Choose a video format supported by iTunes.
On the right side of the app, click the large “Format” image to expand the full library of over 500 configuration presets. Go to the “Apple” category and select the “iTunes Video” profile, which is optimized for iTunes.
You can choose MP4, MOV, or M4V under the “Video” category. Then open the Preferences window and change the video codec to H.264 and the audio encoder to AAC.
Step 3:
Start converting AVI files to iTunes-supported formats.
Choose a location to save the output video files. Finally, click the “Run” button to start the conversion process.
Final words
As you know, although iTunes does not support adding and playing AVI video files, by following the steps outlined in this guide, you can seamlessly convert AVI files and import them into iTunes, ensuring that you can enjoy your favorite videos easily. Don’t hesitate. Give it a try!
Leave a Reply