
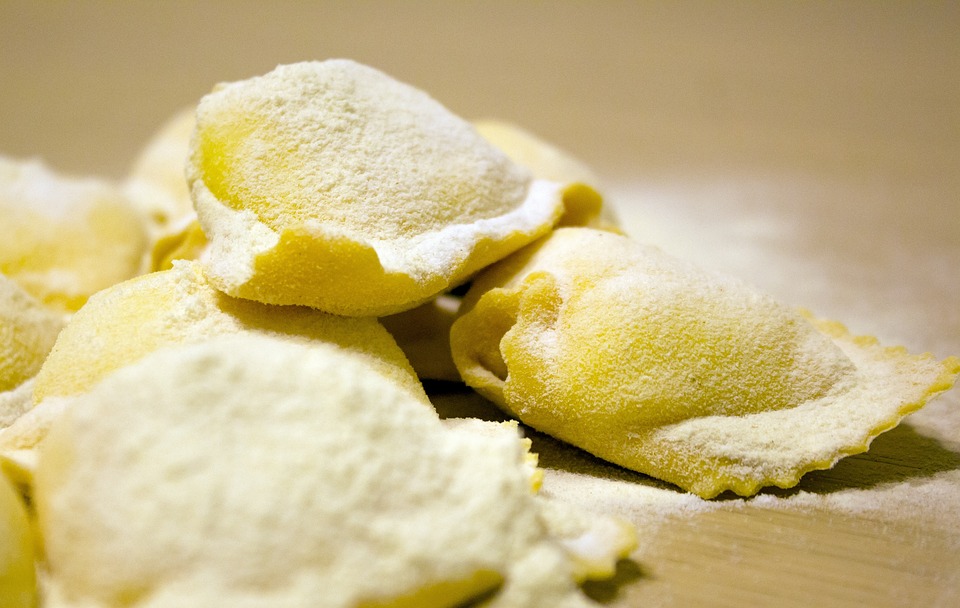
Frozen ravioli offers a convenient and delicious option for those looking to enjoy a gourmet pasta dish without the time-consuming preparation. Whether you’re a busy parent, a student on the go, or simply a lover of Italian cuisine, mastering the art of cooking frozen ravioli can transform your mealtime into a delightful culinary experience. In our comprehensive guide titled “How to Cook Frozen Ravioli,” we delve into the various techniques and secrets to perfecting this beloved pasta dish.
Drawing upon years of culinary expertise and a deep understanding of Italian cooking traditions, we provide readers with detailed instructions, from boiling to baking, ensuring that your ravioli is cooked to perfection, boasting al dente pasta enveloping a succulent filling. This article not only serves as a practical guide but also enriches your knowledge of Italian cuisine, offering insights into selecting the right sauces and accompaniments to elevate your dish.
Join us as we explore the simplicity and versatility of cooking frozen ravioli, offering tips and tricks that cater to both novice cooks and seasoned kitchen aficionados. Whether you’re looking to impress guests or indulge in a quick, satisfying meal, our guide promises to enhance your culinary repertoire, inviting you to explore the rich flavors and textures that make ravioli a timeless favorite.
A Brief History of Ravioli
While the exact origins of ravioli are controversial, most food historians trace it back to medieval Italy. References to a filled pasta called “ravioles” appeared as early as the 14th century in Italian cookbooks. The earliest-known recipe dates back to the mid-1300s in a book by Italian chef Martino da Como.
The name ravioli likely comes from the Italian word “raviole” meaning “little turnips.” Some historians believe it refers to the pillow-like shape of turnip roots. Others link it to a traditional filling of turnip greens and herbs.
Today, ravioli remains a beloved staple in Italian cuisine. It’s especially popular across northern regions like Tuscany, Emilia-Romagna, and Genoa. Italians traditionally serve ravioli at celebrations, feasts, and holidays to honor this historic national dish.
Beyond Italy, ravioli has achieved worldwide fame. The convenience of store-bought frozen and fresh ravioli fuels its global appeal. Home cooks across cultures also craft their own unique ravioli recipes with regional ingredients. This little pasta pocket truly brings joy to millions around the world.
Overview of This Ultimate Guide
In this comprehensive ravioli handbook, I’ll cover:
- Choosing between store-bought vs. homemade ravioli
- Crafting your own ravioli dough and fillings
- Cooking ravioli using traditional and innovative methods
- Sauce and side pairings for built-in flavor
- Serving ideas and wine pairings to impress guests
- Storage, reheating, troubleshooting, and FAQs
Let’s get started with the basics of buying or making your ravioli!
Part 1: Preparing Ravioli
Ravioli begins with choosing between store-bought and homemade varieties. I’ll compare the pros and cons of each so you can decide what fits your skills, budget, and taste buds. You’ll also learn key factors like fillings, nutrition, and allergen-friendly options.
Store-Bought vs. Homemade Ravioli
Save time and effort with store-bought ravioli or enjoy total control over ingredients with homemade. Here are the main factors to weigh:
Store-Bought Pros:
- Convenience: Fresh and frozen ravioli from stores cuts prep time significantly.
- Accessibility: Large selection of fillings and brands at local grocers and online shops.
- Uniformity: Each piece looks and cooks the same for consistent results.
- Affordability: Lower cost than purchasing all dough and filling ingredients.
Store-Bought Cons:
- Preservatives: Added thickeners, stabilizers, and preservatives.
- Flavor: Mass-produced taste lacks distinctive homemade quality.
- Filling unpredictability: Meat, cheese, and veggie ratios can vary.
- Limited control: Can’t customize with premium or seasonal ingredients.
Homemade Pros:
- Ingredient quality: Handpick premium flours, cheese, meats, seasonal veggies.
- Creative freedom: Experiment with diverse global and regional fillings.
- Cooking adjustment: Calibrate dough thickness, filling ratios, flavors.
- Cost savings: Make large batches for a fraction of store prices.
Homemade Cons:
- Time investment: Making dough and filling from scratch takes active prep.
- Learning curve: Developing ravioli shaping and sealing skills takes practice.
- Inconsistency: Each dumpling may vary slightly in appearance, size, or texture.
- Access: Some specialty flours, cheeses, or meats only available at select stores.
Overall, I recommend trying both and seeing which you prefer based on your cooking skills, budget, and desired flavors!
Nutrition Information
Ravioli nutrition varies greatly between fillings. Here are some guidelines for popular options:
Meat ravioli tends to be higher in protein, cholesterol, and saturated fat, with around 200-300 calories per serving.
Cheese ravioli also packs protein and calcium but watch out for high sodium, averaging 350-450 calories per serving.
Veggie ravioli is typically lower in calories, fat, and carbs but gives you important vitamins and minerals. Most are 150-250 calories per serving.
Seafood ravioli has lean protein, healthy omega-3s, and around 300 calories per serving.
Mushroom ravioli is high in B vitamins like riboflavin and excellent for vegetarians at 200-300 calories per serving.
When buying or making ravioli, check nutrition labels and ingredients lists to identify fillings aligned with your health goals. Homemade also allows substituting lower-fat, salt, or sugar options.
Allergens and Alternatives
Ravioli ingredients like wheat, dairy, and eggs are common allergens. Here are some ways to adapt recipes:
- Use gluten-free flour blends in place of wheat flour for a gluten-free dough.
- Substitute plant-based milks and oils if you’re lactose intolerant.
- Replace eggs with flax or chia seeds mixed with water as a vegan egg replacer.
- Avoid seafood, shellfish, beef, or pork fillings for pescatarian or vegetarian diets.
- Swap in turkey, chicken, or plant-based proteins for pork restrictions.
- Omit cheese fillings and use vegetable purees for dairy-free ravioli.
With some thoughtful ingredient tweaks, everyone can enjoy ravioli!
Part 2: Making Homemade Ravioli
Crafting ravioli completely from scratch lets you control the ingredients. Here’s a step-by-step guide to making and filling your own dough.
Equipment Needed
You likely have most of these ravioli making supplies in your kitchen already:
- Stand mixer for dough kneading
- Rolling pin for rolling dough
- Ravioli crimper to seal filled dumplings
- Ravioli cutters for uniform shaping
- Pasta machine for rolling and cutting even dough sheets
- Pastry brush for sealing with egg wash
- Parchment paper to prevent sticking
- Gallon freezer bags for freezing homemade ravioli
Specialty ravioli tools make the job easier but aren’t essential. With some improvising, you can shape by hand with a fork, drinking glass, or biscuit cutter for similar results.
Basic Ravioli Dough Recipe
This classic egg pasta dough recipe serves 4-6 people:
Ingredients:
- 2 1/2 cups (312g) all-purpose flour
- 3 large eggs
- 1 Tbsp (15mL) olive oil
- 1 tsp (6g) salt
Instructions:
- Combine flour and salt in a mixing bowl. Make a well in the center.
- Add eggs and olive oil to the well. Using your fingers or a fork, gradually mix wet ingredients into dry ingredients until a shaggy dough forms.
- Knead dough for about 10 minutes on a lightly floured surface until smooth, elastic, and not sticky. Form into a ball.
- Wrap dough in plastic wrap and let rest at room temperature for 30 minutes before rolling and filling.
Tips for Success:
- Only add flour gradually to prevent dry, tough dough.
- Knead thoroughly to develop gluten for an elastic texture.
- Let dough rest so gluten relaxes for easier rolling.
- Adjust recipe up or down based on number of ravioli servings needed.
Now that your dough is prepped, it’s time for the fun part – fillings!
Filling Ideas: Meat, Cheese, Veggies, and More
Ravioli fillings are only limited by your imagination. Here are some classic and creative combinations:
Cheese: Ricotta, mozzarella, parmesan, pecorino, goat cheese
Meat: Beef, pork, turkey, chicken, sausage, prosciutto
Seafood: Crab, shrimp, lobster, salmon, tuna
Vegetables: Spinach, mushrooms, butternut squash, mashed potatoes, roasted garlic
See more : Taste the Difference: Snow Crab vs King Crab Comparison
Herbs: Basil, parsley, rosemary, oregano, sage
Other filling ideas: Eggplant, sun-dried tomatoes, olives, roasted red peppers, pesto, curried lentils, pumpkin puree
Mix and match fillings for your own signature ravioli flavors. Just avoid very moist ingredients that make dough soggy.
Sealing and Storing Fresh Ravioli
- Place 1 tsp (5 g) of filling an inch apart on dough sheets.
- Brush water around each mound of filling.
- Top with second dough sheet and press between mounds to seal.
- Cut into squares using a fluted ravioli cutter, pizza cutter, or knife.
- Seal edges by pressing with a fork. Refrigerate up to 5 days or freeze for 4-6 months.
That covers the ravioli making process from dough to sealed dumplings ready for cooking and eating!
Part 3: Cooking Ravioli
Now for the fun part – time to start cooking! Here are traditional and outside-the-box methods for cooking your ravioli creations to al dente perfection.
Traditional Methods Revisited
These classic techniques for boiling, baking, or pan frying yield tender, toothsome pasta with crispy edges.
To cook frozen ravioli, you have several easy methods to choose from:
Boiling Method:
1. **Boiling**: Bring a large pot of water to a boil, add salt, and a bit of extra virgin olive oil to prevent sticking. Boil the ravioli for about 4-6 minutes until they float to the top. For al dente ravioli, remove immediately.
Baking Methods:
2. **Baked**: Boil the ravioli for 3 minutes, then coat them in breadcrumbs, parmesan cheese, and Italian seasoning. Bake until golden brown and crispy for a delicious appetizer.
3. **Air Fryer**: Follow the same breading instructions as for baking, then air fry at 400 degrees for 3 minutes.
These methods offer versatility in preparing frozen ravioli quickly and easily, making it a convenient option for delicious meals or appetizers.
Innovative Cooking Methods
Beyond classic techniques, these outside-the-box ideas add fun new dimensions to your ravioli.
Steaming Ravioli for a Delicate Texture
Steaming keeps ravioli tender without making it soggy or waterlogged.
You’ll need:
- Steamer basket
- Parchment paper
- 24 fresh or frozen ravioli
Instructions:
- Fill a pot with 2 inches of water and insert steamer basket. Bring to a boil over high heat.
- Arrange ravioli in a single layer on parchment paper set in the basket.
- Steam 4 minutes for fresh or 6 minutes for frozen until heated through.
- Serve ravioli immediately with your favorite sauce.
Steaming lets the delicate filling flavors shine through.
Grilling Ravioli for a Smoky Twist
Fire-kissed ravioli right off the grill – what could be better?
You’ll need:
- 24 fresh or frozen ravioli
- Metal skewers
- Olive oil cooking spray
- BBQ plank (optional)
Instructions:
- Soak bamboo skewers in water for 30 minutes to prevent burning.
- Thread ravioli onto skewers in a single layer. Lightly coat with olive oil spray.
- Grill skewers over direct medium heat for 2-3 minutes per side until grill marks appear.
- Optionally, grill directly on a soaked cedar plank for a smoky flavor.
- Remove ravioli from skewers and serve with your favorite sauce.
The charred edges offset the filling perfectly.
Crispy Ravioli from Your Air Fryer
Air frying yields crackling hot ravioli with crisped edges in record time.
You’ll need:
- Cooking spray
- 24 fresh or frozen ravioli
Instructions:
- Coat air fryer basket with nonstick cooking spray.
- Arrange ravioli in a single layer with space between each.
- Air fry at 380°F for 6-8 minutes, flipping once halfway through.
- Serve crispy browned ravioli immediately with desired sauce.
The air fryer lets you skip boiling or pan frying for fast crispy ravioli sans excess oil.
Cooking Tips and Tricks
Implement these tips for flawlessly cooked ravioli every time.
Adjust Cooking Time for Different Fillings
Denser fillings take longer to heat through:
- 2-3 minutes: Cheese, veggie, or mushroom
- 4-5 minutes: Meat or seafood
Undercooking risks cold spots, while overcooking makes the filling mushy.
Choose the Right Pot and Water Amount
Use a wide pot with at least a gallon of water per pound of ravioli to allow proper movement and prevent goopy clusters.
Prevent Ravioli From Sticking Together
Gently stir immediately after adding ravioli to boiling water and wait until water returns to a boil before stirring again. Overcrowding or excessive stirring makes them glue together.
Keep Ravioli from Bursting
- Seal dough thoroughly when shaping
- Don’t overfill ravioli
- Avoid overcooking
- Gently stir after adding to boiling water
With these handy tips, you can avoid the common pitfalls of ravioli prep. Now let’s talk serving suggestions!
Part 4: Serving and Enjoying Ravioli
Ravioli offers endless possibilities for creative serving setups. Here are my recommendations for sauces, sides, presentation ideas, and wine pairings.
Sauce Pairing Recommendations
Sauce completes a plate of ravioli. Harmonize the filling and sauce flavors.
Fillings to Sauce Guide:
- Beef – Marinara, bolognese, brown butter and sage
- Cheese – Marinara, alfredo, pesto, tomato cream
- Seafood – White wine butter sauce, lemon caper sauce
- Vegetable – Walnut sage brown butter, wine cream sauce, salsa
- Butternut squash – Brown butter and sage, walnut cream sauce
See more : How Many Grams Are In Half A Cup? | Tips Measure For You
I suggest making sauces before cooking ravioli to allow flavors to meld.
Side Dishes and Wine Pairing
Good ravioli deserves worthy accompaniments!
Classic pairings include:
- Garlic bread or focaccia
- Mixed greens salad with balsamic dressing
- Sauteed vegetables like broccoli rabe or asparagus
- Grilled chicken breast or Italian sausage
Wine suggestions:
- Chardonnay – Buttery, creamy sauces
- Pinot Grigio – Seafood or veggie ravioli
- Chianti – Hearty meat ravioli
- Sauvignon Blanc – Lighter veggie or cheese fillings
A crisp white or medium bodied red accentuates flavors beautifully. Offer sparkling water or lemonade as tasty non-alcoholic pairings.
Serving Ideas and Presentation
Serve ravioli family style for a communal feel:
- On a large platter garnished with basil
- In shallow bowls with sauce ladled on top
- Stacked pyramid style with alternating fillings
- Artfully arranged on individual plates
- In fun handheld cones for a casual outdoor party
However you present it, ravioli makes a comforting and celebratory meal. Play with plating and garnishes to wow your guests!
Part 5: Advanced Tips and Variations
Ready to take your ravioli skills to the next level? Here are some ideas for dietary versions, seasonal fillings, creative leftovers uses, and proper storage.
Health-Conscious and Dietary Adaptations
Ravioli can accommodate a range of nutritional needs and preferences:
Low-Carb: Replace 1/4 of the flour in the dough with almond flour. Choose meat, veggie, or cheese fillings over starchy pastas.
Gluten-Free: Make dough with all-purpose gluten-free flour plus xanthan gum. Verify GF status of any packaged ingredients.
Vegetarian/Vegan: Opt for cheese, veggie, or legume based fillings. Substitute chia or flax eggs for regular eggs in dough.
Low-Fat: Use part-skim ricotta, light cheeses, and leaner meats in fillings. Incorporate more veggies like spinach or mushrooms.
Kid-Friendly: Classic cheese, pepperoni, or crunchy breadcrumb toppings make ravioli fun. Cut into smaller pieces for easy eating.
Ravioli offers something for everyone – get creative with adjustments to suit your needs!
Seasonal and Regional Variations
Tailor ravioli based on seasonal produce or geographic cuisine:
Spring – Asparagus, peas, ramps, fava beans, lemon, mint
Summer – Tomatoes, zucchini, basil, stone fruits, garlic, ricotta
Fall – Butternut squash, pumpkin, sage, Brussels sprouts, walnuts, cinnamon
Winter – Mushrooms, kale, potatoes, parsnips, rosemary, nutmeg
Regional ideas: Tex-Mex chorizo and bean, Southern shrimp and grits, Midwestern wild rice and turkey
Let the ingredients of the season or flavors of your region guide your homemade fillings.
Leftovers and Storage
Made too much ravioli? Here’s how to store and repurpose it:
Storage: Refrigerate unused fresh ravioli in an airtight container up to 4 days. Freeze for 4-6 months.
Reheating: Boil frozen ravioli straight from freezer, adding 1-2 minutes to cooking time. Or microwave individual portions with a damp paper towel over top.
Leftover ideas: Toss with pasta or green salad, bake into casseroles, use as sandwich filler, pan fry for breakfast with eggs.
With proper storage methods and creative ways to use leftovers, you can get the most out of every ravioli batch.
Part 6: FAQs and Troubleshooting
Get answers to common ravioli queries and solutions to possible mishaps:
Q: Does ravioli float when it’s done cooking?
A: Yes, properly cooked ravioli will float to the top in the last 30-60 seconds of boiling. Don’t rely on this alone though, as dense fillings may not float.
Q: My ravioli filling leaks out or pasta doesn’t seal. Help!
A: Make sure to brush the edges thoroughly with water before sealing. Press dough together firmly with a fork. Don’t over stuff fillings. Check dough isn’t too dry.
Q: Is homemade ravioli worth the effort compared to store-bought?
A: That’s subjective based on your time and skills, but homemade does allow for better ingredients and customization. For special occasions, homemade can be worthwhile.
Q: Yikes – my ravioli stuck together and turned mushy! What did I do wrong?
A: Always use a large pot with plenty of generously salted boiling water. Don’t overcrowd pot or stir too frequently after adding ravioli.
Have more questions? Any issues along the way? Let me know in the comments!
Conclusion
I hope this all-inclusive guide gives you the knowledge and inspiration to master ravioli. Keep experimenting with dough textures, creative fillings, and cooking techniques until you develop your ideal recipe.
The options for enjoying this little pasta pillow are endless. Ravioli brings people together – now go share it with someone special!

Executive Chef Marco Velasquez brings his unique, elevated Mexican cuisine to Cheen Huaye. A native of Mexico’s Yucatan Peninsula, Marco honed his skills in some of South Florida’s finest restaurants before opening his own restaurant.
At Cheen Huaye, you’ll experience authentic Yucatecan dishes made from fresh ingredients, to order. Our food has been praised by publications like the Miami New Times and continues to receive rave reviews from diners all over. So if you’re looking for a different take on Mexican food – one that’s still familiar yet exciting – come visit us at Cheen Huaye!
You might be interested :
 Perfect Garlic Prep: Clove to Teaspoon Measurement
 Surprising Facts: How Many Slices in Your Bread Loaf?
 Taste the Difference: Snow Crab vs King Crab Comparison
 How Many Grams Are In Half A Cup? | Tips Measure For You
 Black Eyed Pea Menu | Southern Inspired Dishes & Specials
 Chen’s Garden Menu | Authentic Chinese Cuisine & Take Out
Maybe steam them? Or boil them in an inch of water so they can’t tumble and swirl and break? Try it and see if it works.
Why? Ravioli takes 10 minutes in a pot of boiling water.
Once they float to the top, take them out. You could be over-boiling them.
Thank you. I will try it.
Ten minutes?!?!? 2-3 minutes for fresh ravioli
I’ll definitely take it out when it boils. Thank you for the reminder.