Bài viết này sẽ hướng dẫn bạn cách Cài Đặt Và Cấu Hình MongoDB Với Centos7. Nếu bạn cần hỗ trợ, xin vui lòng liên hệ VinaHost qua Hotline 1900 6046 ext.3, email về [email protected] hoặc chat với VinaHost qua livechat https://livechat.vinahost.vn/chat.php.
1. Giới thiệu về MongoDB Với Centos7
MongoDB là NoSQL database với các ưu điểm như: high performance, high availibily, automatic scaling.
NoSQL database nghĩa là không hỗ trợ SQL (Structured Query Language).
MongoDB không lưu trữ datab ở dạng table, thay vào đó, nó lưu data trong một cấu trúc giống JSON (mà MongoDB gọi là BSON)
Được giới thiệu vào năm 2009. Hiện tại vẫn đang được phát triển bới công ty MongoDB Inc.
2. Yêu cầu cần thiết để cài đặt MongoDB Với Centos7
- VPS cài hệ điều hành Centos 7
- Access SSH với quyền root
3. Các bước cài đặt MongoDB Với Centos7
- Add the MongoDB repository.
- Installing MongoDB.
- Fix some MongoDB errors.
- Check version and locate log file.
- Create an administrator user.
- Enable MongoDB authentication and Testing.
Step 1: Add the MongoDB repository
Truy cập vào VPS Centos 7 với ssh tài khoản root:
➜ ~ ssh [email protected] #IP sẽ thay đổi tùy theo bên cung cấp VPS
Create new repo file:
[root@localhost ~]# vi /etc/yum.repos.d/mongodb-org-3.2.repo
Dán nội dung sau vào file MongoDB repository:
[mongodb-org-3.2]
name=MongoDB Repository
baseurl=https://repo.mongodb.org/yum/redhat/$releasever/mongodb-org/3.2/x86_64/
gpgcheck=1
enabled=1
gpgkey=https://www.mongodb.org/static/pgp/server-3.2.asc
Save file và exit khỏi editor Vim.
Step 2: Installing MongoDB Với Centos7
Ở bước đầu chúng ta đã add MongoDB Với Centos7 repository hoàn tất. Thực hiện list các repo list trên Centos 7 bằng lệnh sau để kiểm tra:
[root@localhost ~]# yum repolist | grep -i mongodb
mongodb-org-3.2/7         MongoDB Repository                                 115
Next, cài đặt MongoDB bằng lệnh yum:
[root@localhost ~]# yum -y install mongodb-org
Khi đã cài đặt hoàn tất, thực hiện start MongoDB bằng câu lênh systemctl command:
[root@localhost ~]# systemctl start mongod
Kiểm tra MongoDB đang running bằng câu lệnh show socket sau:
[root@localhost ~]# ss -lntp | grep mongod
LISTEN 0 128 127.0.0.1:27017 *:* users:(("mongod",pid=2419,fd=6))
Hoặc bằng câu lệnh systemctl command:
[root@localhost ~]# systemctl status mongod
-
mongod.service - SYSV: Mongo is a scalable, document-oriented database.
   Loaded: loaded (/etc/rc.d/init.d/mongod; bad; vendor preset: disabled)

   Active: active (running) since Mon 2022-06-27 23:05:58 EDT; 21min ago

   Docs: man:systemd-sysv-generator(8)

  Process: 2408 ExecStart=/etc/rc.d/init.d/mongod start (code=exited, status=0/SUCCESS)

   Memory: 70.1M

   CGroup: /system.slice/mongod.service

           └─2419 /usr/bin/mongod -f /etc/mongod.conf
Jun 27 23:05:58 localhost.localdomain systemd[1]: Starting SYSV: Mongo is a scalable, document-oriented database....

Jun 27 23:05:58 localhost.localdomain runuser[2415]: pam_unix(runuser:session): session opened for user mongod by (uid=0)

Jun 27 23:05:58 localhost.localdomain runuser[2415]: pam_unix(runuser:session): session closed for user mongod

Jun 27 23:05:58 localhost.localdomain mongod[2408]: Starting mongod: [  OK  ]

Jun 27 23:05:58 localhost.localdomain systemd[1]: Started SYSV: Mongo is a scalable, document-oriented database..
Step 3: Fix some MongoDB errors
Hiện tại MongoDB đã được cài đặt hoàn tất. Chúng ta có thể access vào mongodb shell bằng câu lệnh $ mongo
Người dùng có thể bắt gặp dòng thông báo lỗi sau:
2022-06-27T23:05:58.886-0400 I CONTROL [initandlisten] ** WARNING: soft rlimits too low. rlimits set to 4096 processes, 64000 files. Number of processes should be at least 32000 : 0.5 times number of files.
Để xử lý dòng thông báo sau, chúng ta cần tăng giá trị ulimit configuration cho user mongod, truy cập vào file sau:
[root@localhost ~]# vi /etc/security/limits.conf
Và thêm nội dung sau vào cuối file:
…
# End of file

mongod soft nproc 64000

mongod hard nproc 64000

mongod soft nofile 64000

mongod hard nofile 64000


Save file limits.conf
Chạy lệnh sysctl command và restart mongod để apply thay đổi cho system:
[root@localhost ~]# sysctl -p

[root@localhost ~]# systemctl restart mongod
Sau khi hoàn tất. Khi truy cập shell mongod sẽ không còn thông báo lỗi nữa.
Step 4: Check version and locate log file
Kiểm tra phiên bản Mongodb
[root@localhost ~]# mongod –version
db version v3.2.22
git version: 105acca0d443f9a47c1a5bd608fd7133840a58dd
OpenSSL version: OpenSSL 1.0.1e-fips 11 Feb 2013
allocator: tcmalloc

modules: none

build environment:

    distmod: rhel70

    distarch: x86_64

    target_arch: x86_64
Kiểm tra vị trí log file:
– Trong quá trình sử dụng, Admin cần xem trạng thái cũng như các lỗi xảy ra với mongodb, vì vậy việc đọc file log rất cần thiết.
– File log có vị trí: /var/log/mongodb/mongod.log
[root@localhost ~]# tailf -n 5 /var/log/mongodb/mongod.log

2022-06-27T23:38:09.731-0400 I NETWORK  [HostnameCanonicalizationWorker] Starting hostname canonicalization worker

2022-06-27T23:38:09.731-0400 I FTDC     [initandlisten] Initializing full-time diagnostic data capture with directory '/var/lib/mongo/diagnostic.data'

2022-06-27T23:38:09.731-0400 I NETWORK  [initandlisten] waiting for connections on port 27017

2022-06-27T23:38:12.680-0400 I NETWORK  [initandlisten] connection accepted from 127.0.0.1:35012 #1 (1 connection now open)

2022-06-27T23:40:24.323-0400 I NETWORK  [conn1] end connection 127.0.0.1:35012 (0 connections now open)
Step 5: Create an administrator user
Ở phần này, chúng ta sẽ tạo một user mới “VINAHOST” cho mongoDB và gán cho role “UserAdminAnyDatabase”
Switch to database VINAHOST

> use VINAHOST

switched to db VINAHOST
Thực hiện query MongoDB Với Centos7 bằng câu lệnh sau để tạo mới user Administrator:
> db.createUser(

...   {

...     user: "VINAHOST",

...     pwd: "vinahost@123",

...     roles: [ { role: "userAdminAnyDatabase", db: "admin" } ]

...   }

... )

Successfully added user: {

          "user" : "VINAHOST",

          "roles" : [

                     {
                               "role" : "userAdminAnyDatabase",

                               "db" : "admin"
                     }
          ]
}
Trên đây là cách khởi tạo 1 user MongoDB Administrator mới.
Step 6: Enable MongoDB authentication and Testing
Ở bước này, chúng ta cần phải enable tính năng authentication cho users để ngăn các user không có đủ quyền (privileges) có thể truy cập và đọc được databases.
Truy cập vào file sau và thực hiện chỉnh sửa như mô tả:
[root@localhost ~]# vi /etc/init.d/mongod
tìm dòng:
OPTIONS=" -f $CONFIGFILE"
edit như bên dưới:
OPTIONS=" --auth -f $CONFIGFILE"
Save file mongod lại và thực hiện restart daemon và mongod
[root@localhost ~]# systemctl daemon-reload

[root@localhost ~]# systemctl restart mongod
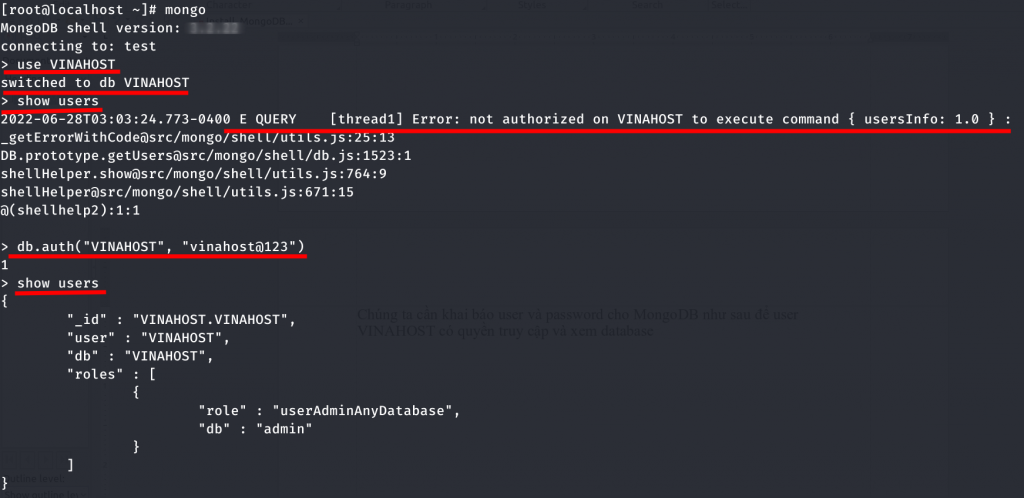
Kiểm tra lại, thực hiện truy cập vào shell mongodb và thực hiện lệnh show users VINAHOST:
[root@localhost ~]# mongo

MongoDB shell version: 3.2.22

connecting to: test

> use VINAHOST

switched to db VINAHOST

> show users

2022-06-28T03:03:24.773-0400 E QUERY    [thread1] Error: not authorized on VINAHOST to execute command { usersInfo: 1.0 } :

_getErrorWithCode@src/mongo/shell/utils.js:25:13

DB.prototype.getUsers@src/mongo/shell/db.js:1523:1

shellHelper.show@src/mongo/shell/utils.js:764:9

shellHelper@src/mongo/shell/utils.js:671:15

@(shellhelp2):1:1
Bạn sẽ thấy hệ thống sẽ thông báo error về lỗi not authorized execute command on VINAHOST (user VINAHOST chưa có quyền thực thi lệnh)
Chúng ta cần khai báo user và password cho MongoDB Với Centos7như sau để user VINAHOST có quyền truy cập và xem database. Như hình là thành công:
Một số lệnh shell MongoDB Với Centos7 cơ bản:
> db # Trả về kết quả default database test
> db [example] # Switch tới database khác với example là tên database
> user Database_Name # Tạo database mới, nếu database đã tồn tại sẽ trả về database hiện có.
> show dbs # Xem danh sách các database của user hiện tại.
> db.dropDatabase() # Xóa database
> help # Hỗ trợ một số lệnh căn bản
> exit # Thoát khỏi hệ shell của MongoDB
Chúc bạn thực hiện cài đặt MongoDB Với Centos7 thành công!
THAM KHẢO CÁC DỊCH VỤ TẠI VINAHOST
>> SERVER – COLOCATION – CDN
>> HOSTING
>> WEBSITE
>> TÊN MIỀN


